- KB517
- Dec 15, 2023 12:57 PM
How do I navigate and customize PDF-XChange Editor and the Ribbon UI?
Questions:
I have downloaded and installed PDF-XChange Editor, and I am having difficulty navigating the new interface/understanding the new features.
I am used to the Classic UI interface in V6 of PDF-XChange Editor. The layout/features appear to be different in newer releases, even in the Classic UI, and I would like to know what has changed and where settings and layout options etc are located.
How do I customize the Ribbon UI in PDF-XChange Editor?
Answer:
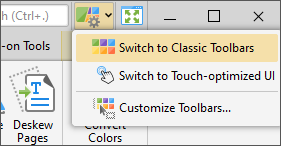
Note! The new "Ribbon UI" is the default, however one can switch back to the "Classic UI" and back with the controls at the top right of the application:
What's new?
A host of new features and functionality has been introduced since V7 of PDF-XChange Editor. These include:
- The dynamic Ribbon UI.
- New editing features/options, including Autosave/Autorecovery, expanded OCR and recompression modes, the Word Count feature and alignment options for content items.
- MRC (mixed raster content) support.
- Expanded Snapshot and Select Text Tools.
- 'Selection' options that enable the editing of selected content, such as creating new documents or stamps, transforming the current selection and/or zooming directly to the selected content.
- New options for creating/editing weblinks.
- New modes for the Edit Content tool: edit either All content, or only Images/Text/Shapes.
- Updated macro system for Bates numbering and Headers and Footers.
- Convert selected text to Microsoft Word Document, Powerpoint Presentation or Microsoft Excel Workbook.
- Multiple new editing options for portfolio files.
- Support of TWAIN 32-bit scanners in 64-bit environments and vice-versa.
- Two new form options.
- Numerous further improvements, tweaks and bug fixes. A comprehensive list is available here.
Click the Headers below to learn more about each area of the software.
Classic UI changes
PDF-XChange Editor was completely renovated for the V7 build, and streamlined in order to optimize workflow efficiency. The new layout - in both the Classic V6 UI and Ribbon UI mode - may take a little while to grasp, but we are absolutely confident that our users will be satisfied with the new setup, and far prefer it to V6, once they understand how to use it and get to grips with what has changed. First of all, let's take a look at the default V6 UI in comparison to the default V7 UI in Classic mode:
.png)
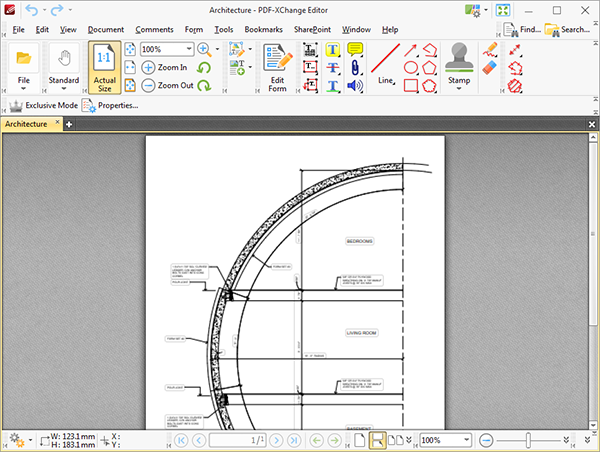
The majority of settings and the layout has remained the same. This is also true for most of the commands and functions in the submenus of the Menu Toolbar (File, Edit, View, Document etc). However, there are some important differences to note:
- There is no longer an Object submenu in the Menu Toolbar. The options that were in this submenu ('Transform Selection' and 'Duplicate Annotations') have been moved to the Edit submenu.
- The Advanced submenu has been renamed Bookmarks - but all available options in the submenu remain the same.
- The View submenu contains a new pane in the Other Panes entry. The new pane is called the Document Recovery pane, and is used in conjunction with the new Autosave feature.
- The options to Add Barcode and Add Image have been moved from the Document submenu to the Add options in the UI. The Add options are located beneath the Tools tab from the image above:
![]()
- The options to Add Barcode, Add Image and Add Text are also available in the Tools submenu under Content Editing Tools -> Add.
- The Edit Content Tool, which the icon immediately above the Add options icon can be used to access, now features modes the enable the selection of specific content. The options are All content, Text content, Image content or Shape content.
- There is a new option in the Help submenu that can be used to check for updates to the software.
- The blue Undo/Redo arrows, which were located in the main body of the user interface in V6 (next to the Hand Tool) are now located in the upper-left corner of the window.
- The option to Fit Visible has been added to the zoom section of the main toolbar.
- The Edit Comments tool has been renamed Select Comments and is located in the options of the Standard button:
.png)
Modern Ribbon UI
Note that In the Ribbon UI, the Home tab will always be the first tab you see upon starting the Editor, currently there is no way to change this.
Use the menu detailed in the image below to switch between the Classic UI and the Ribbon UI:
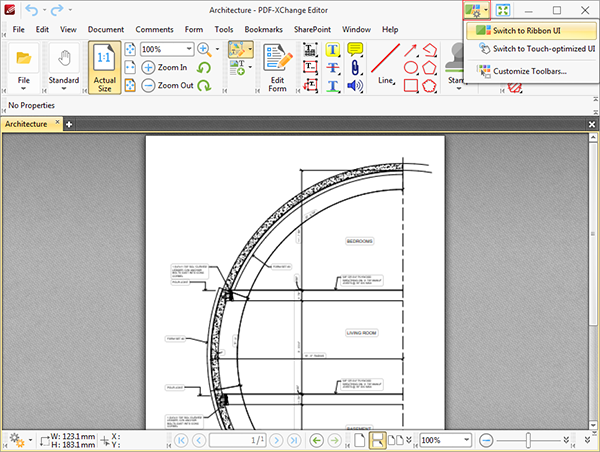
The Ribbon UI appears as below:
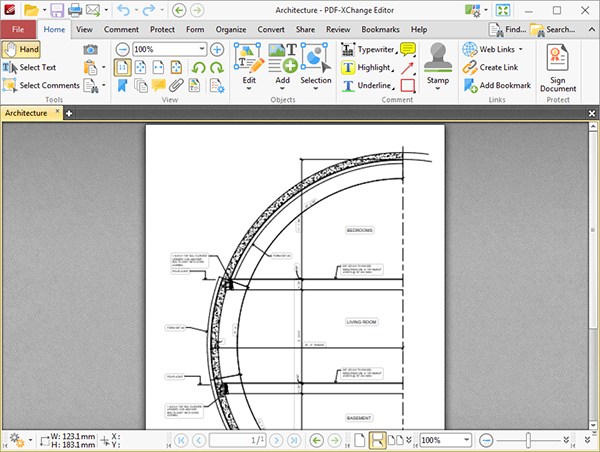
A Ribbon UI is a graphical control element in the form of a set of toolbars placed on multiple tabs. The Ribbon UI format started to gain ground in 2007, when the Microsoft Office products began to utilize it, and since then has become very popular worldwide. The Ribbon UI format uses graphical buttons to represent commands, grouped by functionality, that would otherwise be listed in submenus - which was the structure of PDF-XChange Editor in V6. PDF XChange decided to implement the option of utilizing a Ribbon UI for PDF-XChange Editor in our V7 release. This involved considerable restructuring of the software and its associated functionality.
Classic "menu" tool locations
File
The 'File' option is available in both the Classic and Ribbon UI:
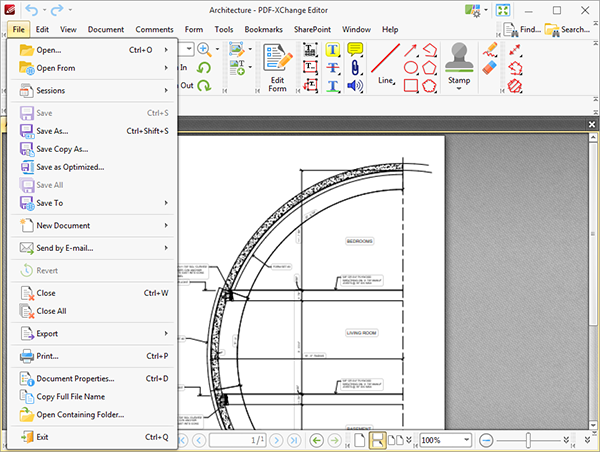
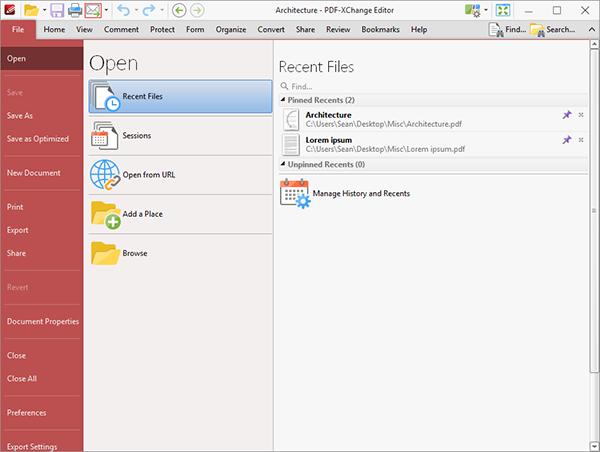
The settings available in the File ribbon tab are almost identical to those in the File submenu of the Classic UI, but please note:
- 'Save Copy As', 'Copy Full File Name' and 'Open Containing Folder' are not yet available in the Ribbon UI, but will be added later.
- 'Send by Email' is not given in the list of available options in the Ribbon UI because it is available in the upper toolbar (highlighted in the image above).
- The 'Add a Place' option is used to add specific places when working in conjunction with Dropbox, Google Drive, SharePoint and local directories. This feature has been improved in comparison to V6.
Edit
There is no Edit ribbon tab in the Ribbon UI, because the contents of this submenu have been added to different ribbon tabs, in accordance with their functionality. The Edit submenu appears as below in V6:
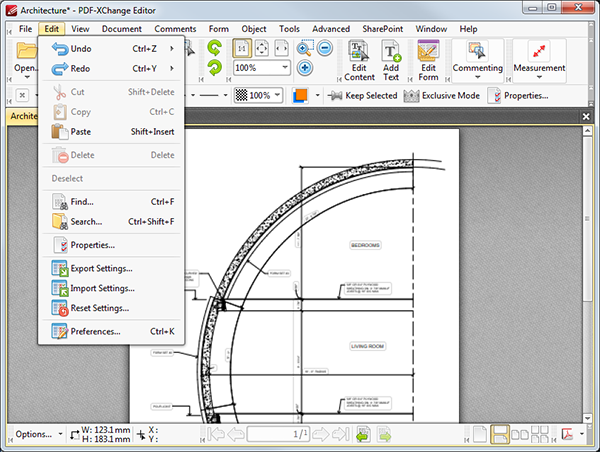
This submenu has been broken down as follows in the Ribbon UI:
- Undo/Redo are available in the icons at the upper-left of the main window. These icons are available regardless of the ribbon tab selected.
- Cut, Copy, Paste, Delete and Deselect are available in the right-click context menu or the Selection button in the Home tab when document content is selected.
- The Find and Search functions are available in the upper-right section of the main window. These icons are available regardless of the ribbon tab selected.
- Properties is in the View ribbon tab, in the Panes submenu (listed as Properties Pane).
- Export/Import/Reset Settings and Preferences are available in the File ribbon tab.
View
The 'View' option is available in both the Classic and Ribbon UI:
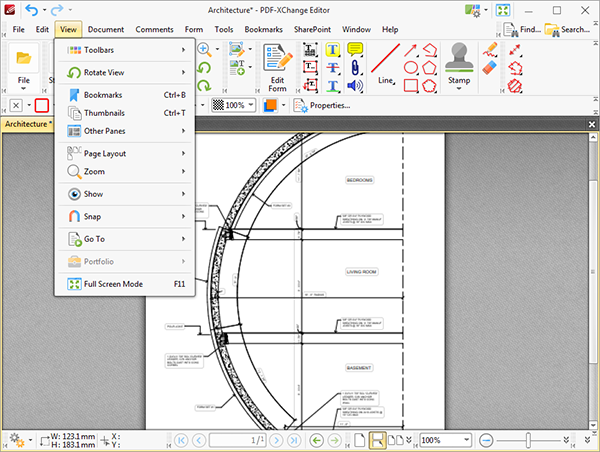
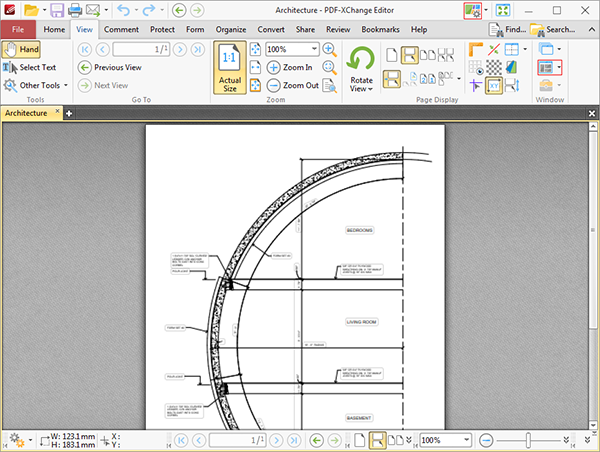
The settings available in the View ribbon tab are almost identical to those in the View submenu of the Classic UI, but please note:
- The 'Toolbars' option is located in the UI Options dropdown menu, which is within the upper of the two highlights in the image above.
- Bookmarks, Thumnails and Other Panes (including the new Recovery Pane) are located in the Panes submenu, which is within the lower of the two highlights in the image above.
- The Page Layout, Zoom, Show and Portfolio options are all available in the View ribbon tab - except for the JavaScript Console, which is located in the Form ribbon tab.
- It is not yet possible to enable/disable Snapping from the Ribbon UI, or to browse to the Previous/Next Document - these options will be added later.
- Full Screen Mode is available in the upper-right section of the main window - next to the UI Options dropdown menu, which is highlighted in the image above.
Document
The Document submenu has been renamed as the Organize ribbon tab in V7. Almost all of the options in the Document submenu are available in the Organize ribbon tab, with the following exceptions:
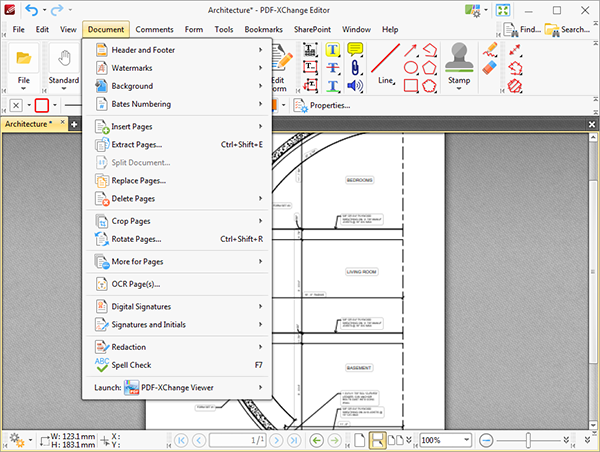
- The Page Transitions option in the More for Pages submenu is located in the View ribbon tab.
- The Digital Signature and Redaction options are located in the Protect ribbon tab.
- The Spell Check feature is located the in Review ribbon tab.
- The Launch options are available in the lower-right corner of the main window, and can be customized in the Launch Applications preferences section (available in the File ribbon tab).
Comments
Form
All options available in the Form submenu of the classic UI are available in the Form ribbon tab. N.b. there is no 'Edit Form' button, as the options that this button enabled in V6 are present when the Form ribbon tab is enabled.
Object
There is no 'Object' ribbon tab in V7. The commands that were present in this submenu in V6 are now located in the Home ribbon tab, within the Selection menu when content is selected.
Tools
There is no 'Tools' ribbon tab in V7. The contents of the Tools submenu in V6 are available at the following locations in V7:
- The Hand Tool and Select Text Tool are available on the left side of many of the ribbon tabs, as is Other Tools submenu, which includes the Snapshot Tool.
- The Zoom Tools are available in the View ribbon tab.
- The Edit Content and Add Text Tools are available in the Home ribbon tab.
- The Comment and Markup Tools are available in the Comment ribbon tab. N.b. The Edit Comments Tool is called Select Comments in V7, and the Stamps Palette is located in the Stamp Tool dropdown menu.
- The Link Creation Tool is available in the Home ribbon tab.
- The Measurement Tools are available in the Comment ribbon tab. Calibrate Measurement is in the Scale dropdown menu of Format ribbon tab. The Format ribbon tab is enabled when the Measurement Tools (or any other tools) are selected:
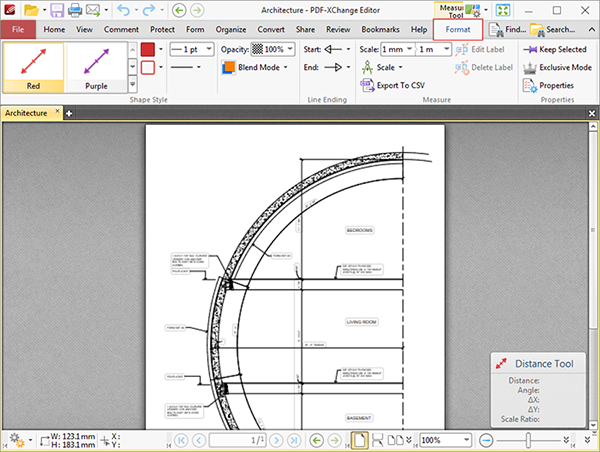
The Format ribbon tab is used to customize tools and enable options such as Keep Selected, Exclusive Mode and the active Blend Mode - in the same manner as the Properties Toolbar was used in V6 of PDF-XChange Editor.
Advanced
The Advanced submenu was renamed as the Bookmarks ribbon tab in V7. The available commands are identical to those that were available in V6.
SharePoint
The options in the SharePoint submenu in V6 have been moved to the File ribbon tab in V7, and are available when the Share option is selected.
Windows
There is no Windows ribbon tab in V7. The contents of the Windows submenu in V6 were broken down as follows in V7:
- New Document Window, Active Document/All Document options and Close All are available in the Document Tabs dropdown menu of the View ribbon tab.
- Reset Main Pane and Reset Document Panes and not available in the Ribbon UI by default, but they can be added using a custom ribbon tab/toolbar as desired. See below for further information on the creation of custom ribbon tabs and toolbars.
- Split/Remove Split are available in the View ribbon tab. Click the Split dropdown menu to enable/disable a split view of the active document.
- Close All is available in the File ribbon tab.
- Reopen Recently Closed Document is available in the Document Tabs dropdown menu of the View ribbon tab.
Help
All options that were available in the Help submenu of V6 are available in the Help ribbon tab, along with some additional commands.
How to Customize the Ribbon UI
1. Click the Help ribbon tab, then click Customize Toolbars. The Customize Toolbars dialog box will open.
2. Click the New dropdown menu and select New Ribbon Tab:
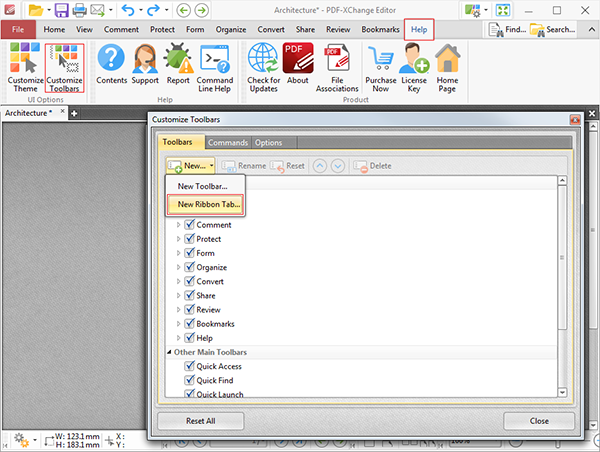
The New Ribbon Tab dialog box will open.
3. Enter a title for the new ribbon tab (this example will use the title 'New Ribbon Tab') then click OK.
The new ribbon tab will appear in the list of Main Tabs and in the Ribbon UI:
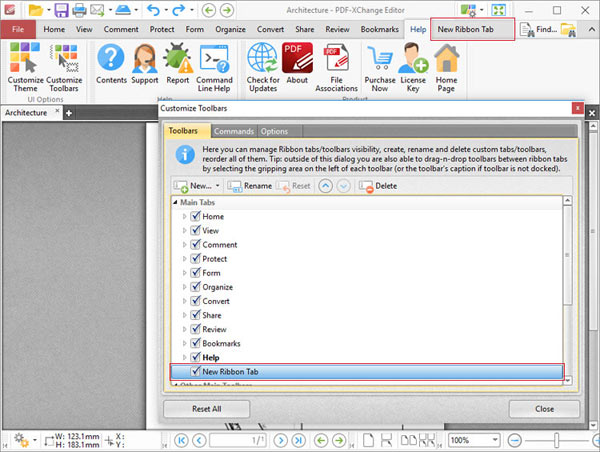
The next step is to add commands to the new ribbon tab:
4. Click the Commands tab in the Customize Toolbars dialog box, then click and drag commands from the list of commands into the new ribbon tab.
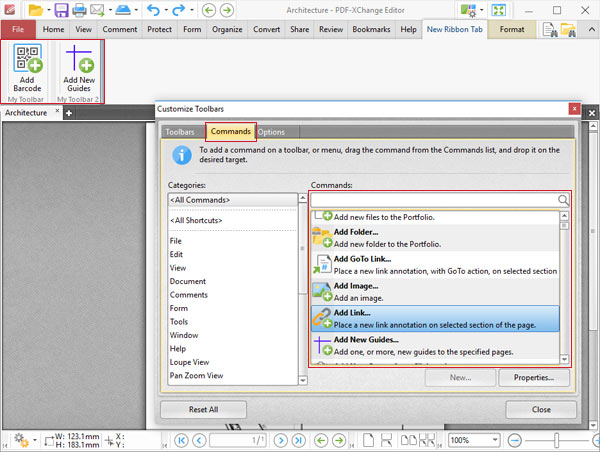
Alternatively, it is possible to create new toolbars and add commands to them:
1. Follow steps one and two above, and select New Toolbar instead of New Ribbon Tab at the last stage of step two.
The New Toolbar dialog box will open.
2. Enter a name for the new toolbar (this example will use the name 'New Toolbar') and click OK.
The new toolbar will appear in the upper-left section of the main window:
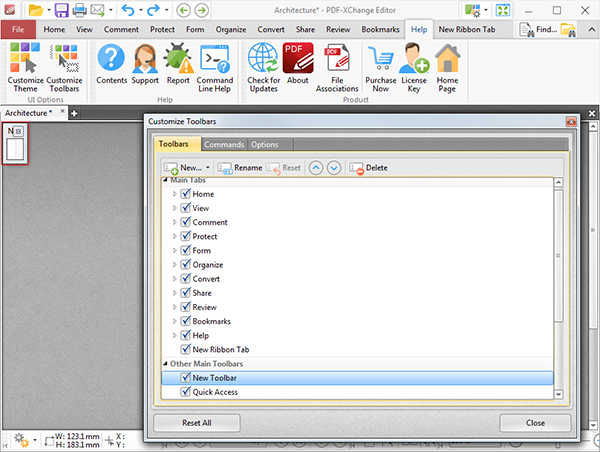
3. Click the Commands tab in the Customize Toolbars dialog box, then click and drag the desired commands from the list of commands into the new toolbar:
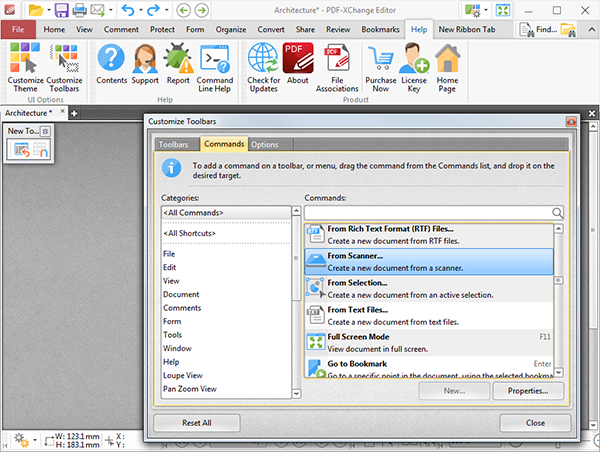
Additionally, please note that it is possible to click and drag commands from the list of commands to any existing toolbar, and many other locations in the UI, including empty ribbon tabs.
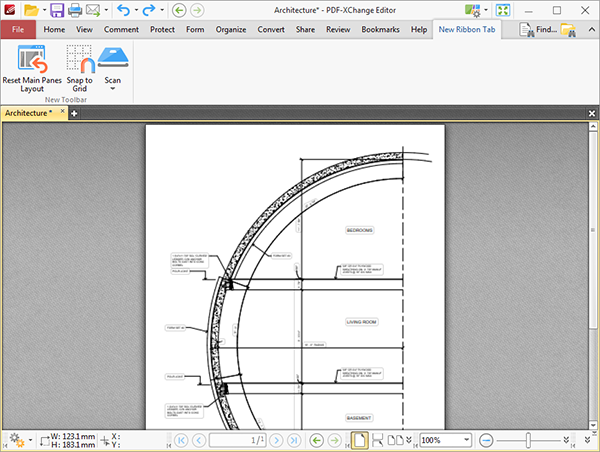
4. Click the desired ribbon tab for the new toolbar, then click and drag it to the desired location in the ribbon tab. If an empty ribbon tab is being used then it is necessary to drag the new toolbar to the far left side. The following icon will de displayed when the location is correct:
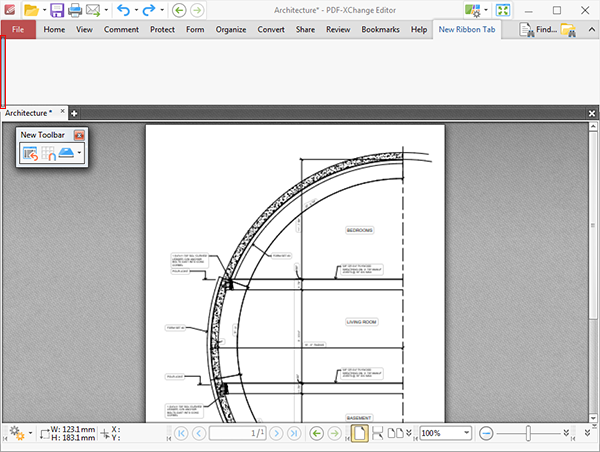
The new toolbar will then be available in the ribbon tab, and will feature the commands added at step three:
More Like This
- KB#456: How Do I Customize toolbars in PDF-XChange Editor?
- KB#431: How do I add new Languages to the Editor Spellchecker?
- KB#282: Why won't the "Email Document" feature work in conjunction with Microsoft Outlook?
- KB#370: How do I reposition the Document Toolbars?
- KB#338: What are the MSI installation switch options for the PDF-XChange family of products?